Jenkins Master
A Jenkins master is the primary controlling system for a Jenkins instance. It has complete access to all Jenkins configuration and options and the full list of jobs. It is the default location for executing jobs if another system is not specified.
Jenkins Slave
An agent is the same as what earlier versions of Jenkins referred to as a slave. Traditionally in Jenkins, this refers to any non master system. The idea is that these systems are managed by the master system and allocated as needed, or as specified, to handle processing the individual jobs. For example, we might allocate different agents to do different builds for different OS flavors, or we might allocate multiple agents to run in parallel for testing.
Jenkins slave, is a worker machine, or container, that connects to a Jenkins master and executes tasks when directed by the master. The agent section specifies where the entire pipeline or specific stage will execute in the Jenkins environment, depending on where the agent is placed. Agents are used to offload tasks from the Jenkins master; this makes possible parallel execution of jobs and scalability of the Jenkins infrastructure.

Use-Case
Create an agent by setting up a node on Jenkins
Create a new AWS EC2 Instance and connect it to master(Where Jenkins is installed)
The connection of master and agent requires SSH and the public-private key pair exchange.
Verify its status under “Nodes” section.
Create two AWS Ubuntu EC2 instances : Master and Agent.

In Master instance, install Java and Jenkins.
##Java
sudo apt-get update
sudo apt-get install openjdk-11-jdk

##Jenkins

sudo curl -fsSL https://pkg.jenkins.io/debian-stable/jenkins.io-2023.key | sudo tee   /usr/share/keyrings/jenkins-keyring.asc > /dev/null
sudo echo deb [signed-by=/usr/share/keyrings/jenkins-keyring.asc]   https://pkg.jenkins.io/debian-stable binary/ | sudo tee   /etc/apt/sources.list.d/jenkins.list > /dev/null## Add GPG key
sudo curl -fsSL https://pkg.jenkins.io/debian-stable/jenkins.io-2023.key | sudo tee   /usr/share/keyrings/jenkins-keyring.asc > /dev/null
sudo apt-get update
sudo apt-get install jenkins

#Start Jenkins instance
sudo systemctl start jenkins
sudo systemctl status jenkins
sudo systemctl enable jenkins
Verify Jenkins installation using http://<EC2_Public_IP>:8080.

In Agent instance, install Java and Docker.
##Java
sudo apt update
sudo apt install openjdk-11-jdk

##Docker
sudo apt-get update
sudo apt-get install docker.io
Lets connect the master and agent.
The connection of master and agent requires SSH and the public-private key pair exchange.
In master,
ssh-keygen
cd .ssh
ls
ssh-keygen produces a public-private key pair.
id_rsa --> private key
id_rsa.pub --> public key
Copy the public key[id_rsa.pub] (to give to the agent node)

Now, in agent,
cd .ssh
vim authorized_keys
Edit authorized keys and paste the public key from the master instance.


Now, lets set up a new node. Go to Manage Jenkins and click on Set up node.

Enter Node name and select Permanent agent.

Enter all details. Here, when we use labels for the agent, your master server would trigger the builds for the agent server.

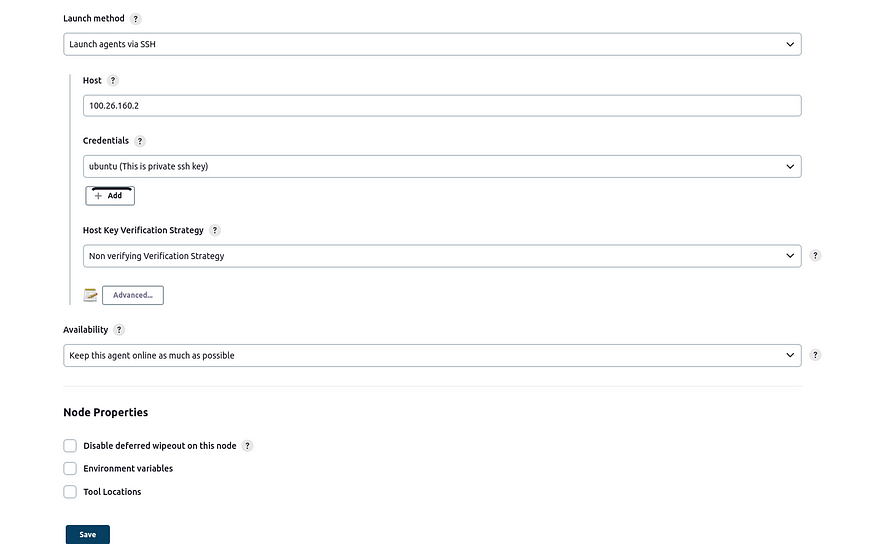
For launch method, select ‘Launch agents via SSH’. Add public IP of Agent instance at the Host field.

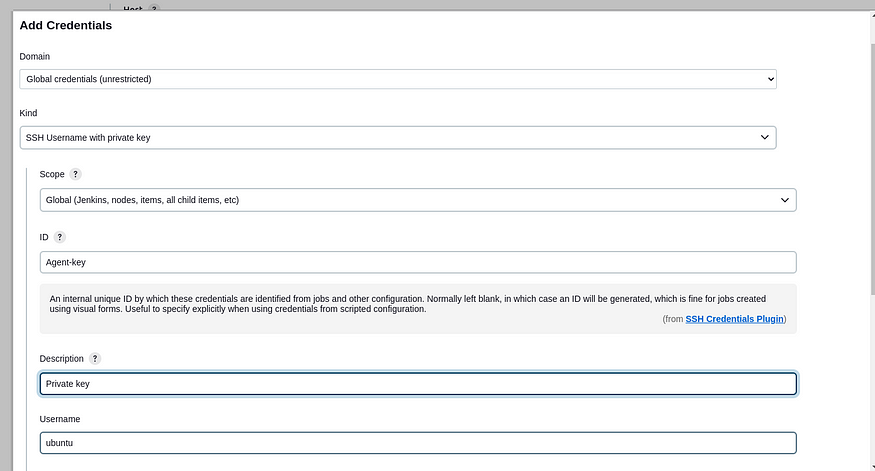
For Credentials, add new credentials (if you do not already have them saved in Jenkins). Select ‘SSH username with private key’ . Fill all required details, and in the private key area add Private key from master instance (id_rsa).

Save the configuration details. And you can verify that the Agent is up and running if set-up properly.
In case of any error, check the logs and try to resolve them accordingly using the Agent instance CLI.
