Tools for Vulnerability Analysis
Clair
Clair provides a JSON API that extracts all layers of the image and can be executed to inspect container images, for example, as part of continuous integration and continuous delivery process.
We can install Clair through the Docker Compose tool and the repository https://github.com/quay/clair#docker-compose. These are the commands for installing it in your local machine:
curl -LO https://raw.githubusercontent.com/coreos/clair/05cbf328aa6b00a167124dbdbec229e348d97c04/contrib/compose/docker-compose.yml
The Clair configuration defines how images should be scanned. You can download it with the following command:
mkdir clair_config && curl -L https://raw.githubusercontent.com/coreos/clair/master/config.yaml.sample -o clair_config/config.yaml
Next, we need to update the Clair configuration, setting the version of Clair to the last stable release and the default database password:
sed 's/clair-git:latest/clair:v2.0.1/' -i docker-compose.yml &&
sed 's/host=localhost/host=postgres password=password/' -i clair_config/config.yaml
Use the following command to deploy only the Postgres container from the compose file
docker-compose up -d postgres
Next, we can download and load the CVE details for Clair to use:
curl -LO https://gist.githubusercontent.com/BenHall/34ae4e6129d81f871e353c63b6a869a7/raw/5818fba954b0b00352d07771fabab6b9daba5510/clair.sql
And then push this data in the Postgres container using
docker run -it -v $(pwd):/sql/ --network "${USER}_default" --link clair_postgres:clair_postgres postgres:latest bash -c "PGPASSWORD=password psql -h clair_postgres -U postgres < /sql/clair.sql"
Now the database is ready to be used and we can deploy the Clair container using the below-mentioned command
docker-compose up -d clair
We can now send Docker Images to scan and return which vulnerabilities it contains. To scan all the layers from a Docker image we can use tools like Klar https://github.com/optiopay/klar. This tool allows analyzing images stored in a private or public Docker registry for security vulnerabilities using Clair container service. We can use the following command to download the latest release from GitHub:
curl -L https://github.com/optiopay/klar/releases/download/v1.5/klar-1.5-linux-amd64 -o /usr/local/bin/klar && chmod +x $_
We can use the following command to analyze vulnerabilities in a Docker image, where CLAIR_ADDR is the server address where Clair has been hosted:
CLAIR_ADDR=<clair_server> klar <Docker_image>

Anchore
Anchore is an open source tool that inspects, analyzes, and certifies Docker images. This analysis is done against a proprietary database (Postgres) formed by the collection of information on vulnerabilities and security problems (CVE) from operating system distributions.It also collects the same information from the logs of popular packages like Node.JS, NPM, and Ruby.
Anchore can download any image from a registry compatible with Docker V2. And with the result of the analysis, it generates a report with the details of the image, a list of artifacts (npm, gem, Python, and Java), a list of operating system packages, the list of image files, and a list of vulnerabilities.

Anchore engine architecture consists of five components that can be implemented in a single container or in a Kubernetes cluster:
Anchore Engine CLI: It is the main command line interface provided by the Anchore suite to be able to rule the solution. It is mainly responsible for interpreting and sending the commands passed to the Anchore Engine API.
Anchore Engine API: This service allows you to orchestrate the entire solution. It is also used to analyze images and obtain policy evaluations and govern the solution completely.
Anchore Policy Engine: The policy engine is responsible for scanning for vulnerabilities in the artifacts found in the image and providing a quick assessment of the policies on that data.
Anchore Engine Analyzer: This component is responsible for the downloading of images and their analysis.
Anchore Engine Database: Anchore is built around a PostgreSQL database that contains tables for all the necessary services that are communicated through API calls.
Deploying Anchore engine
You can use the following command to download the latest version of anchore-engine:
git clone https://github.com/anchore/anchore-engine
cd anchore-engine
The first step is to download the configuration files (docker-compose.yaml and config.yaml) from the GitHub project.
curl https://raw.githubusercontent.com/anchore/anchore-engine/master/docker-compose-dev.yaml > docker-compose.yaml
curl https://raw.githubusercontent.com/anchore/anchore-engine/master/conf/default_config.yaml > config.yaml
The config.yaml file is a configuration file with the basic configuration the Anchore Engine requires to run. It has several parameters, including defaults, log level, listening port, username, and password, that you can adjust to meet specific requirements. We can execute the following docker-compose command using the same path where we have downloaded the docker-compose.yaml file to start Anchore Engine:
docker-compose up -d
docker ps
The preceding command will extract the Anchore image and automatically create the Anchore engine and database. Once completed, the command will start the Anchore engine. Wait till all container state is healthy.
Install anchore cli using pip
#Install anchore cli using pip
python3 -m pip install --upgrade pip
pip install anchorecli
git clone https://github.com/anchore/anchore-cli
cd anchore-cli
pip install --user –upgrade.
python setup.py install
Configure anchore username and password.
mkdir $HOME/.anchore
vi $HOME/.anchore/credentials.yaml
Add below lines in .anchore/credentials.yaml file.
default:
  ANCHORE_CLI_USER: 'admin'
  ANCHORE_CLI_PASS: 'anchorepassword'
  ANCHORE_CLI_URL: 'http://localhost:8228/v1'
Replace anchorepassword with the value of ANCHORE_ADMIN_PASSWORD environment variable which was set in docker-compose.yaml file
scan images using below command. Run this command till analysis status changes to analysed.
docker pull django:latest
anchore-cli --u admin --p PASSWORD image add django:latest

We can execute the following command to check the results of the vulnerability analysis in the django:latest image.
docker-compose exec api anchore-cli image vuln django:latest all

AWS ECR(Amazon Elastic Container Registry)
Amazon Elastic Container Registry (Amazon ECR) is an AWS managed container image registry service that is secure, scalable, and reliable. Amazon ECR supports private repositories with resource-based permissions using AWS IAM. This is so that specified users or Amazon EC2 instances can access your container repositories and images.
Install the AWS CLI
sudo apt-get install awscli
Create an IAM User
Create an IAM user, assignAdministratorAccess, Create and download access key.csvfile.

Configure AWS CLI on your machine
Configure AWS using access key available in .csv file.
#configure aws and use access key specified in .csv file
aws configure
Create an ECR repository
Create AWS ECR repository with ScanOnPush option enabled using AWS Management Console.

Build docker image using AWS ECR
In AWS Management Console ,Go to Created ECR repository and select View Push Commands .Follow instructions and commands.

After pushing image to ECR , you can see scanning and vulnerabilities using AWS Management Console.

Trivy
Trivy https://github.com/aquasecurity/trivy is an open source tool that focuses on detecting vulnerabilities in packages at the operating system level and dependency files of different languages. Trivy provides installers for most Linux and macOS systems. We can use the following commands to install Trivy in a Debian based distribution. Read more https://aquasecurity.github.io/trivy/v0.18.3/quickstart/
sudo apt-get -y install wget apt-transport-https gnupg lsbrelease
wget -qO - https://aquasecurity.github.io/trivyrepo/ deb/public.key | sudo apt-key add
echo deb https://aquasecurity.github.io/trivy-repo/deb
(lsb_release -sc) main | sudo tee -a /etc/apt/sources.list.d/trivy.list
sudo apt-get update
sudo apt-get -y install trivy
Once installed, we can see the options it offers with the -h option:
trivy -h

Scan image using trivy
When analyzing the image, we see the vulnerabilities that have been detected and the information related to the vulnerable packages and libraries, organized by level of criticality:
trivy image ubuntu:18.04

Dagda
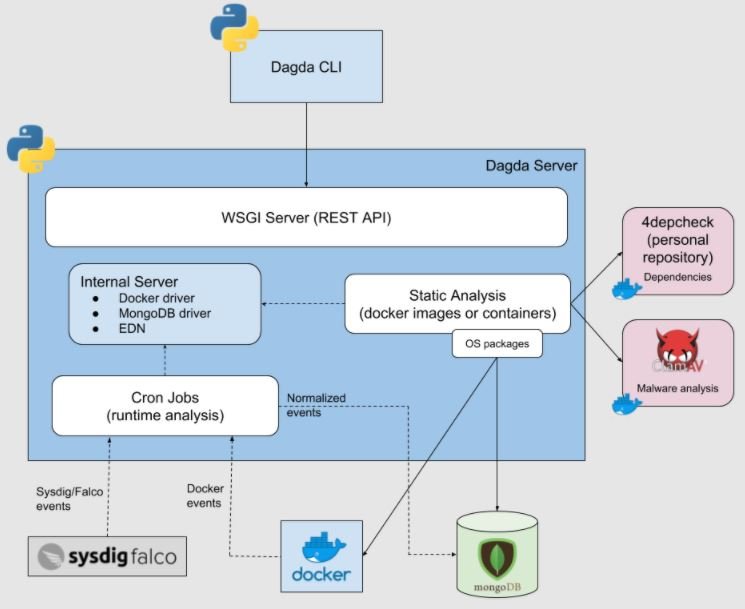
Dagda is a tool to perform static analysis of known vulnerabilities, trojans, viruses, malware & other malicious threats in docker images/containers and to monitor the docker daemon and running docker containers for detecting anomalous activities.
The project can be found in the GitHub repository at https://github.com/eliasgranderubio/dagda.

git clone https://github.com/eliasgranderubio/dagda.git
cd dagda
pip3 install -r requirements.txt
Installation of MongoDb
docker pull mongo
docker run -d -p 27017:27017 mongo
Installation of kernel headers in the host OS
You must have installed the kernel headers in the host OS because Dagda is integrated with Falco for monitoring running docker containers to detect anomalous activities.
apt-get -y install linux-headers-$(uname -r)
Usage
You must run python3 dagda.py start for starting the Dagda server. See the start sub-command in the wiki page for details.
After the Dagda server started and before the Dagda CLI usage, you must set the next environment variables as you need:
export DAGDA_HOST='127.0.0.1'
export DAGDA_PORT=5000
Although in this usage documentation only the CLI usage is shown, Dagda has a REST API for using it. See REST API documentation page for details.
Populating the database
For the initial run, you need to populate the vulnerabilities and the exploits in the database by running:
python3 dagda.py vuln --init
Analyzing docker images/containers
python3 dagda.py check --docker_image django:latest
