


Jenkins Pipeline
Jenkins Pipelines, specifically Pipeline-as-Code, is an approach to defining and managing your Continuous Integration and Continuous Deployment (CI/CD) workflows as code. This code is typically written in Groovy and is stored in a version control system like Git alongside your application code.
Jenkinsfile
Jenkinsfile uses Domain-specific Language (DSL) based on Groovy programming language.
With DSL, youcan define stages and steps that manage different application lifecycle management activities.
Jenkinsfile based pipeline checks the source code, where Jenkinsfile is used.
Jenkinsfile execution starts on agents configured in it based on stages and steps defined in it.
Jenkinsfile Syntax
Jenkins pipeline supports two syntaxes for two kinds of pipeline:
Read more about syntax: https://www.jenkins.io/doc/book/pipeline/syntax/
Declarative Pipeline: Declarative Pipeline, which is a relatively recent addition to Jenkins pipeline came into picture as an alternative to create pipeline as code using Jenkins.Declarative Pipeline uses predefined structure and model. Hence, it allows programmers and non-programmers to quickly create standardized and stable pipelines without the steep learning curve of Scripted Pipelines or groovy.
The Declarative Pipeline must be enclosed within a pipeline block.#Declarative Pipeline pipeline { agent { label:'worker'} stages { stage('Source') { // Get code } }
Pipeline: The pipeline block is required in a Jenkins Declarative Pipeline. It is the outermost section and signals that this is a Pipeline project. The syntax is simply pipeline {} with the rest of the code within the closure
 pipeline
 {
  // pipeline code
 }
Agent: The agent directive specifies where the entire pipeline or a specific stage runs.
Environment: An environment definition in the top-level pipeline block will make the variable accessible to all steps in the pipeline.
 environment {
     TIMEZONE = "eastern"
     TIMEZONE_DS = "${TIMEZONE}_daylight_savings"
 }
Tools: The tools directive allows us to specify which of these we want to have auto installed and made available in the path on the agent we’ve chosen.
 tools {
 gradle "gradle3.2"
 }
Options: This directive can be used to specify properties and values for predefined options that should apply across the pipeline.
 options {
     buildDiscarder(logRotator(numToKeepStr:’3’))
 }
Triggers: This directive allows you to specify what kinds of triggers should initiate builds in your pipeline.There are four different (SCM-neutral) triggers currently available: cron, pollSCM, upstream, and githubPush.
 triggers {
 upstream(upstreamProjects: 'jobA,jobB', threshold:
 hudson.model.Result.SUCCESS)
 }
Parameters: This directive allows us to specify project parameters for a Declarative Pipeline. The input values for these parameters can come from a user or an API call.
 pipeline {
     agent any
     parameters{
     string(defaultValue: "maintainer",
     description: 'Enter user role:', name: 'userRole')
 }
 stages {
     stage('listVals') {
         steps {
             echo "User's role = ${params.userRole}"
         }
     }
 }
 }
Libraries: This directive allows Declarative Pipelines to import shared libraries so that code contained in them can then be called and used.
 pipeline {
     agent any
     libraries {
     lib("mylib@master")
     lib("alib")
     }
     stages {
     ...
Stages: In a Declarative Pipeline, the collection of individual stages is wrapped by the stages section. This makes our Declarative Pipeline more structured and tells Jenkins where the stages begin and end, as opposed to the pipeline-level directives that we’ve been looking at. stages is a required section, and you must have at least one stage within it.
 pipeline {
     agent any
     stages {
     stage('name1') {
     steps {
     ...
 }
Conditional execution of a stage. In any stage, you can have conditional execution. That is, you can have Jenkins decide whether or not to execute the steps in the stage based on one or more conditions evaluating
 stage('debug_build') {
     when {
     branch 'test'
     }
     ...
 }
Post: post is another section available for use in the pipeline or in a stage. It is optional in both places. If present, it gets executed at the end of a pipeline or stage if the conditions are met.
 post {
     <condition name> {
     <valid DSL statements>
 }
     <condition name> {
     <valid DSL statements
 }
 ...
Scripted Pipeline: Scripted Pipeline provides flow control using a general-purpose DSL or domain-specific language built with Groovy. With Groovy language functionality, we can use loops, conditional statements, exceptional handling with try-catch, finally block, etc.
Node
Node is the generic term that is used in Jenkins 2 to mean any system that can run Jenkins jobs. This covers both masters and agents, and is sometimes used in place of those terms.
Stage
Stage within a node definition, a stage closure allows us to group together individual settings, DSL commands, and logic. A stage is required to have a name, which provides a mechanism for describing what the stage does.
Steps
A step is the lowest level of functionality defined by the DSL. These are not Groovy commands, but can be used with Groovy commands.
 #Scripted Pipeline
 node('worker') {
     stage('Source') { // Get code
     #Get code from our Git repository
     }
 }
Use-Case
Jenkins Pipeline to Create Docker Image and Push to Dockerhub
First just create the Angular project…
ng new <new-project-name>
Create dockerfile with below content at root of project
FROM node:latest as node
RUN mkdir -p /app
WORKDIR /app
COPY package*.json /app/
RUN npm install
COPY . /app/
EXPOSE 4200
CMD ["npm", "run", "start"]
Creat Jenkinsfile at root of project
node {
      def app
      stage('Clone repository') {

            checkout scm
      }
      stage('Build image') {

            app = docker.build("brandonjones085/test")
       }
      stage('Test image') {
            app.inside {

             sh 'echo "Tests passed"'
            }
        }
       stage('Push image') {
                                                  docker.withRegistry('https://registry.hub.docker.com', 'git') {
       app.push("${env.BUILD_NUMBER}")
       app.push("latest")
              }
           }
        }
Once you have the Jenkinsfile created, create a Github repo and push the entire project to the repo.
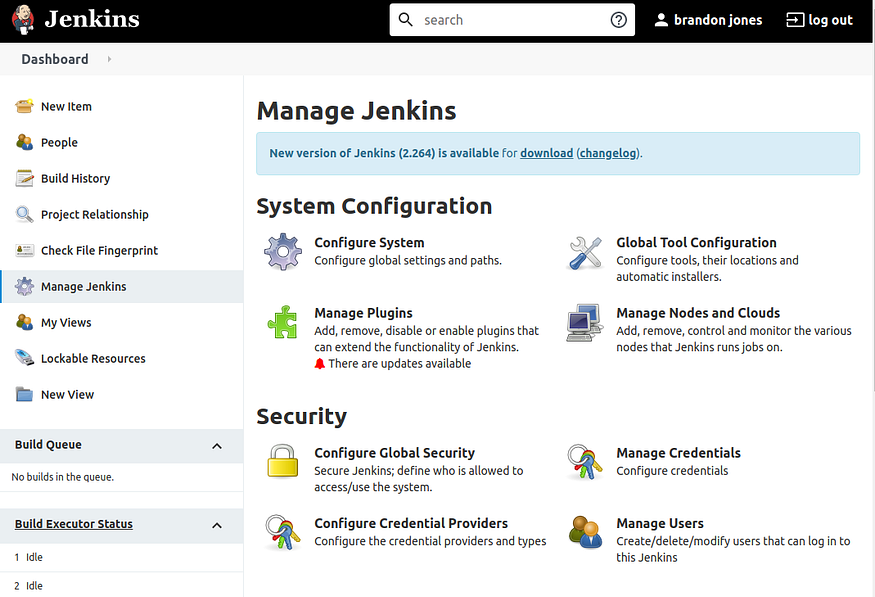
Now we can begin working in Jenkins and creating the project. I’m assuming you already have a Jenkins server installed and running. First, let’s add the Dockerhub credentials in Jenkins. These credentials will be used to log into Dockerhub. Click Manage Jenkins, then Manage Credentials.

Click global, then Add Credentials to add a new credential with a Global Scope.

Add your Dockerhub username and password. The ID is was is used in the Jenkinsfile and your credentials are stored and you can see this used in the Jenkinsfile.

select new Item. Enter a name for the new item, select Multibranch Pipeline and click OK.
Go to Configure and Enter a Display Name for the pipeline.

Under Branch Sources, enter the Github repo URL and click Validate. Since this is a public repo, you won’t need to add any credentials, but if you’re using a private repo, you will need the credentials.

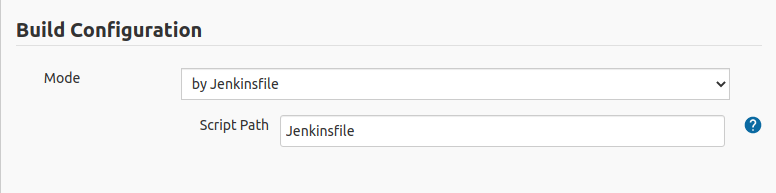
Under Build Configuration leave the default Jenkinsfile because this will look for the Jenkinsfile in the cloned repo.
That’s it, click save and the project should begin running immediately.

The project will take a few minutes to run, but the initial output should look similar to mine.
